5. Configuring Metacat
Contents
When Metacat (Tomcat) is started, the Metacat servlet checks to see if it is configured. If not, Metacat will automatically send you to the configuration pages.
If the installation is new, or the previous version is before 1.9.0, pay close attention to the configuration values. If you have upgraded Metacat, and the previous version is 1.9.0 or later, Metacat will pull existing configuration settings from a backup location. You should still verify that the values are correct.
To access your Metacat, open a Web browser and type:
http://<your_context_url>
Where <your_context_url> is the URL of the server hosting the Metacat followed by the name of the WAR file (i.e., the application context) that you installed. For instance, the context URL for the KNB Metacat is: http://knb.ecoinformatics.org/knb
You can always open the configuration screen from within Metacat by typing:
http://<your_context_url>/admin
5.1. Initial Configuration
Before you can log in to the Metacat and configure it, you are required to confirm Metacat’s back-up location and authentication configuration (if not already configured). Metacat will automatically attempt to locate an existing back-up directory, but you may need to correct the value or specify a directory (if the installation is new, or if Metacat was unable to determine the location of an existing back-up directory). The authentication configuration is required for logging in to the Metacat and for defining administrative accounts. Instructions for Changing Authentication Configuration without Authentication are included at the end of this section.
5.1.1. Back-up Configuration
To preserve its configuration settings, Metacat backs up crucial configuration details to a directory outside the application directories. Because a new installation/upgrade does not know where this external directory is, Metacat uses a discovery algorithm to locate it. If Metacat cannot identify a backup directory, you will see the Backup Directory Configuration screen.
Note
If the metacat.properties file has many custom settings, it should be manually backed up before any Metacat upgrade as deploying a new Metacat war file will overwrite the existing file.
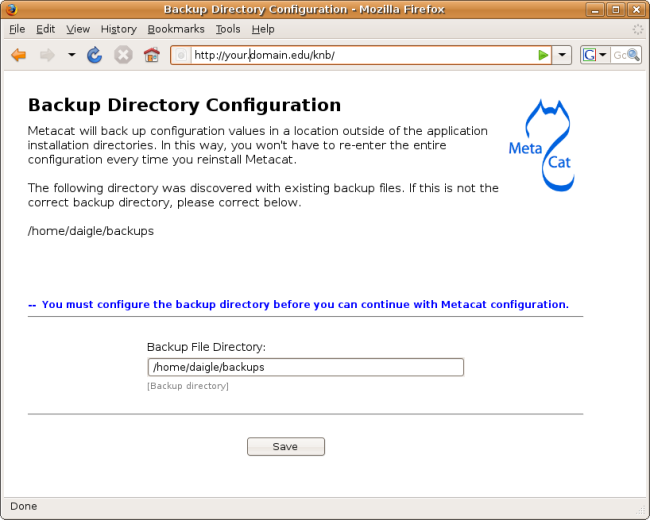
Configuring the Backup Directory.
5.1.2. Authentication Configuration
Whether you are installing or upgrading the Metacat servlet, you will automatically be sent to the Authentication Configuration page. You can also reach the Authentication Configuration page from a running Metacat by typing:
http://<your_context_url>/admin
Metacat uses either an internal password file or LDAP as its authentication mechanism.
You can choose the authentication mechanism by selecting either AuthFile or AuthLdap class.
We will only allow trusted partners to access the NCEAS LDAP server to ensure the security of our user base.
If you are not in the trusted partner list, you may choose the internal password file authentication
or set up your own LDAP server. You also can define your own authentication mechanism by creating a Java
class that implements AuthInterface.
Required configuration values for the password file authentication are:
Authentication Class
Metacat Administrators
Users Management URL
Password File Path.
Required configuration values for LDAP authentication are:
Authentication Class
Metacat Administrators
Users Management URL
Authentication URL
Authentication Secure URL.
Make sure that your user account information is entered into the Metacat Administrators field (e.g., uid=daigle,o=nceas,dc=ecoinformatics,dc=org). You will not be allowed to continue with configuration if this is missing. Multiple accounts can be entered, separated by the colon (:) character.
Note
To create an account on the password file, please see the section called Metacat Authentication Mechanism. To create an LDAP account on the KNB LDAP server (specified as the default LDAP server), go to https://identity.nceas.ucsb.edu and select the “create a new user account” link.
If you make changes to the authentication settings, you must restart Tomcat to put them into effect.
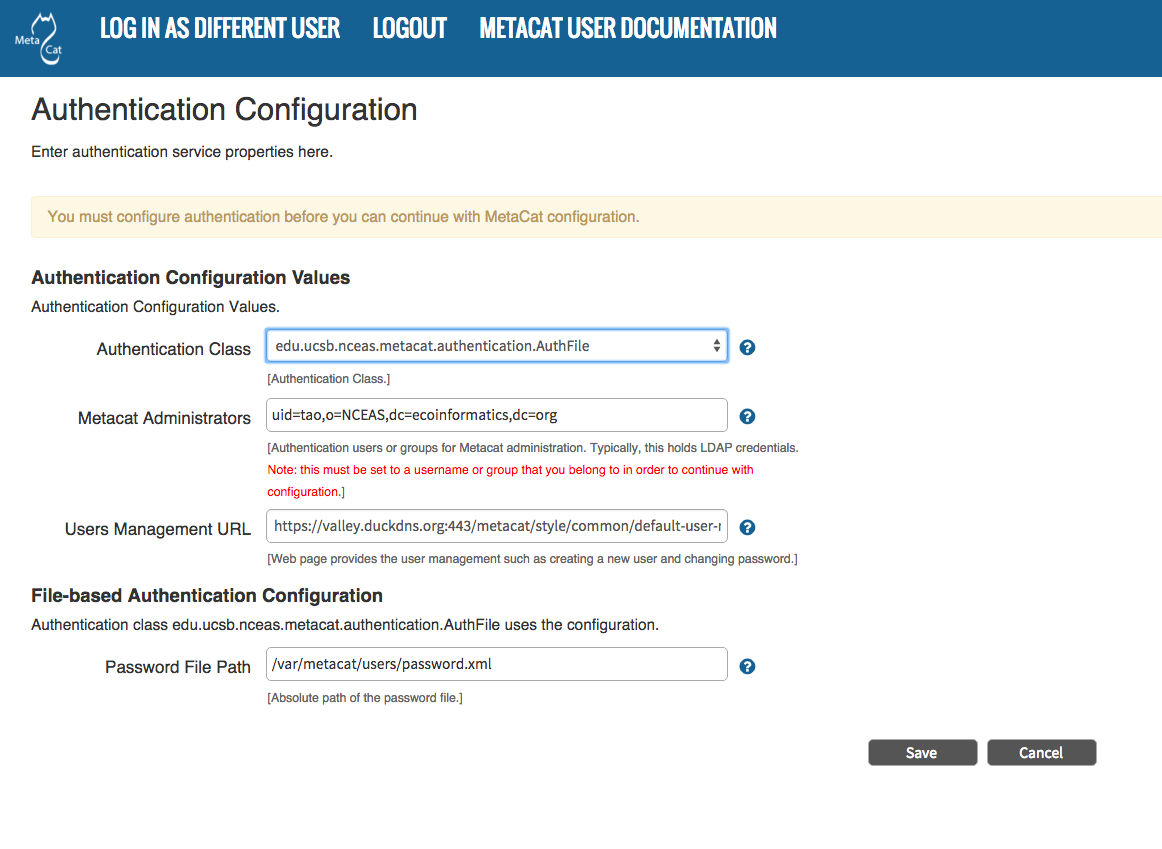
Configuring Password File Authentication Values.
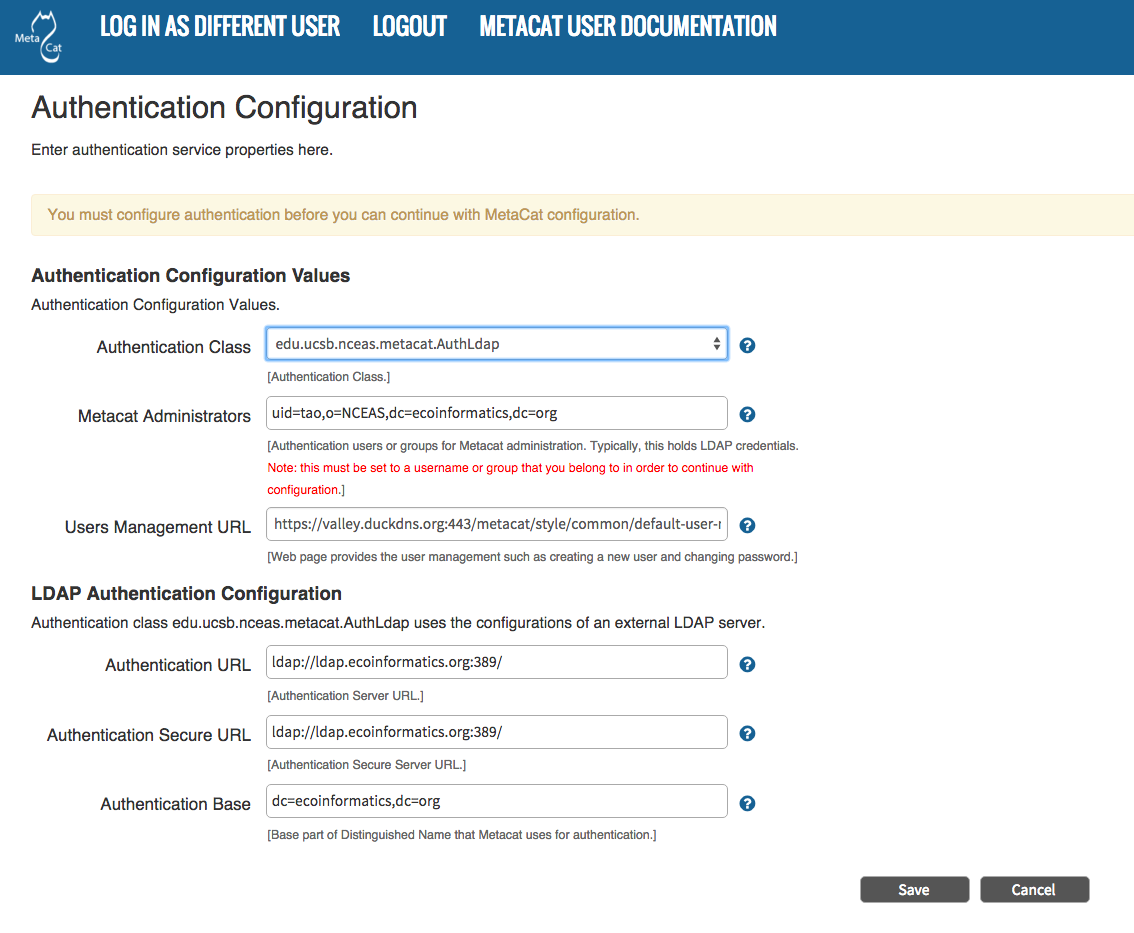
Configuring LDAP Authentication Values.
5.1.3. Changing Authentication Configuration without Authentication
If you need to change or add authentication information and cannot authenticate using the existing authentication settings (e.g., the existing Metacat administrator is no longer available or you forgot the administrator password), you must edit the Metacat configuration file by hand. This ensures that only a person who has access to the Metacat server and the configuration files on that server will be able to change the administrator accounts.
To edit the authentication configuration file:
- Stop Tomcat and edit the Metacat properties (
metacat.properties) file in the Metacat context directory inside the Tomcat application directory. The Metacat context directory is the name of the application (usually metacat):
<tomcat_app_dir>/<context_dir>/WEB-INF/metacat.properties
- Change the following properties appropriately:
auth.administrators - a colon separated list of administrators
auth.url - the authentication server URL
auth.surl - the authentication secure server URL
auth.file.path  - the authentication password file path
- Save the
metacat.propertiesfile and start Tomcat.
5.2. Logging in to Metacat
In order to configure Metacat, you must log in with an administrative account that has been configured in the Authentication Configuration settings. If you did not set up the correct administrative user there, you must change the authentication configuration by hand before you can log in.
In the log-in screen enter your user name and password and click the “Login” button.
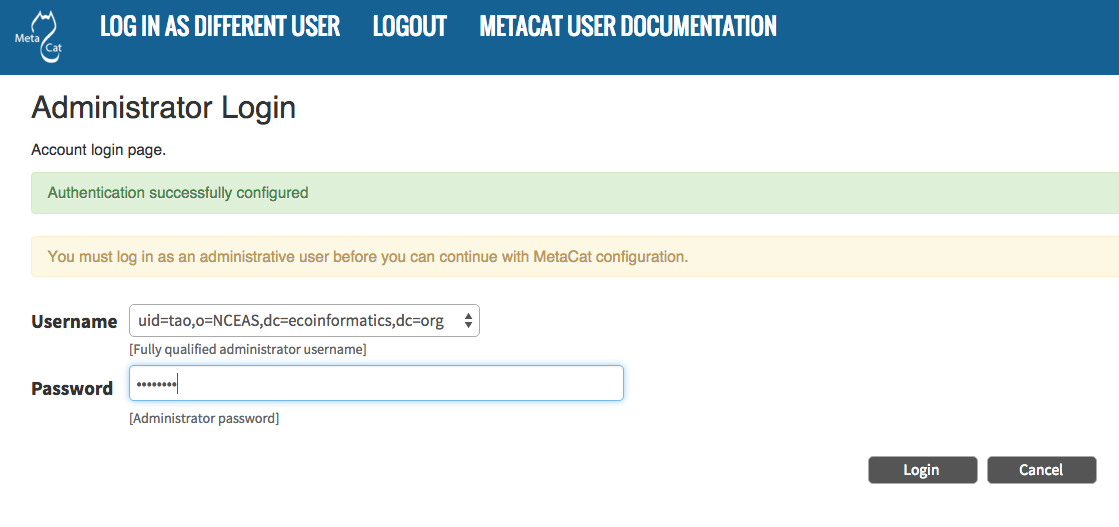
Logging into Metacat.
5.3. Required Configuration
All required Metacat settings can be accessed from the Metacat Configuration utility, which becomes available after the initial configurations have been specified and an authorized administrator logs in.
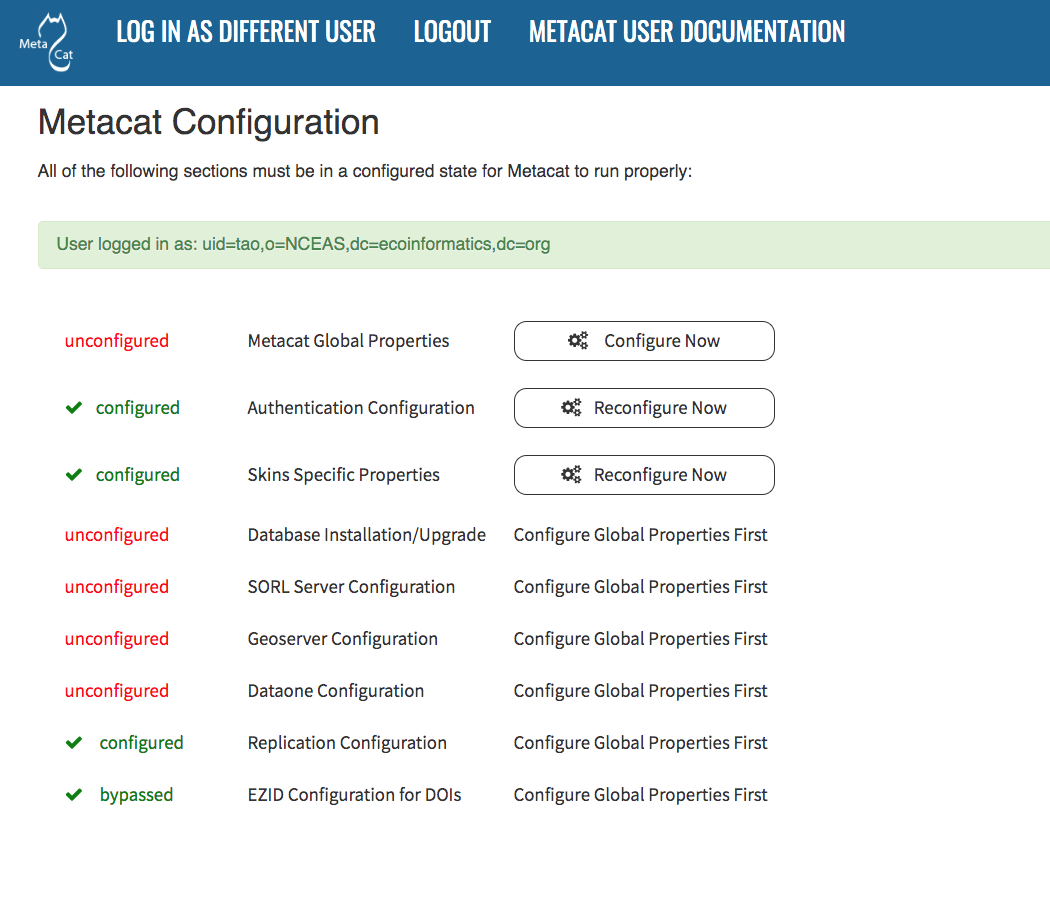
Metacat configuration menu, showing each configuration section. Once all
sections are marked as green configured, metacat can be accessed.
The configuration settings are grouped into five sections (Metacat Global Properties, Authentication Configuration, Skins Specific Properties, Database Installation/Upgrade, Geoserver, DataONE, and Replication Configuration), each of which is listed with its current status (see table).
| Status | Description |
|---|---|
| unconfigured | The section has yet to be configured |
| configured | The section has been configured. |
| bypassed | The administrator can choose not to configure or skip the section. |
To the right of each configuration section is one of the following options: Configure Now, Reconfigure Now, Configure Global Properties First, or Version:X.X.X. If the option is linked (e.g., Configure Now or Reconfigure Now), you can select the link to open the associated configuration settings and edit them. If the option is not linked (e.g., Configure Global Properties First), the settings cannot be specified until the global properties are set. Once the global properties are configured, the option to configure this section becomes available. The Version:X.X.X option is used only for the Database Installation/Upgrade section. If the database schema version detected by Metacat matches the application version (eg, 1.9.0), then no further database configuration is required.
All settings must be in a configured or bypassed state in order to run Metacat. For new installations or upgrades, click the “go to metacat” link that appears after configuration is complete to go directly to Metacat. Note that Metacat indexes at start-up time, so the initial start-up may take some time depending on the amount of data in your database and wheter or not you have opted to regenerate the spatial cache. If you are reconfiguring a running version of Metacat, you must restart the Tomcat server for the changes to take effect.
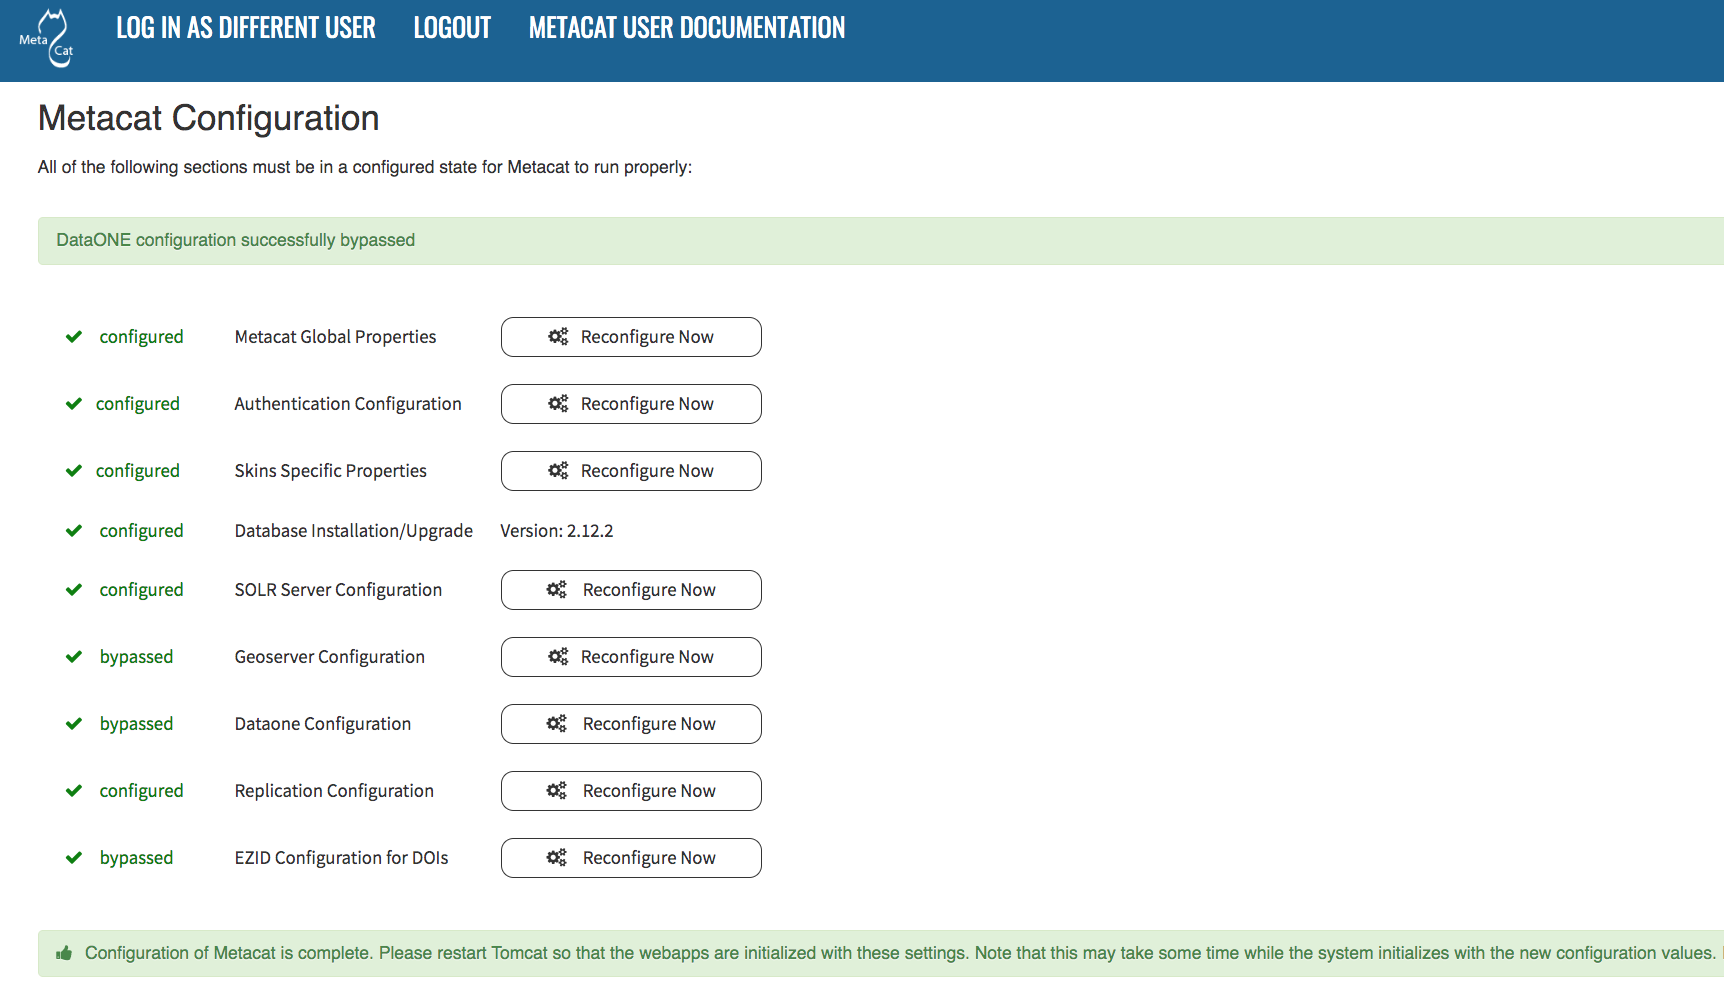
The Metacat settings as they appear after having been configured.
5.3.1. Global Properties (server, ports, etc)
The Metacat configurations included under Global Properties represent the bulk of the settings required to run Metacat. Click a blue question-mark icon beside any setting for detailed instructions. More information about each property is also included in the Appendix: Metacat Properties.
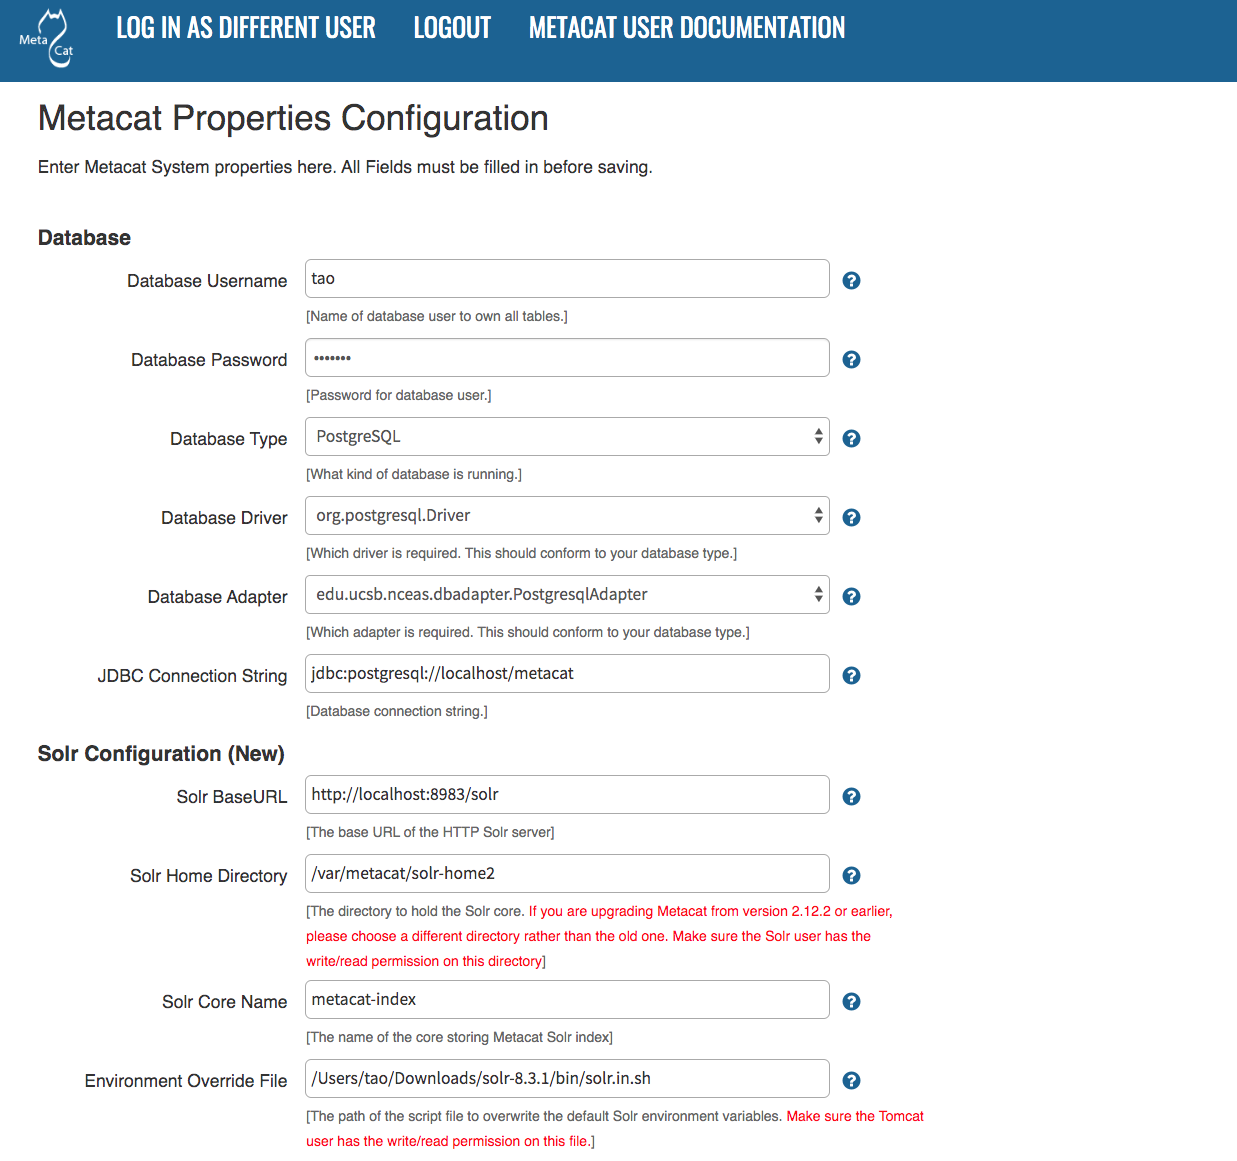
The Metacat Global Properties editing screen.
When you save global properties, Metacat also saves a back-up file that is
located in /var/metacat/.metacat (on Linux). When you update Metacat,
the system automatically locates the back-up file so you do not have to re-enter
the configuration settings.
The first time you install Metacat, the system attempts to automatically detect the values for a number of settings (see table). It is important to ensure that these values are correct.
| Property | Description |
|---|---|
| Metacat Context | The name of the deployed Metacat WAR file (minus the .war extension). E.g., “metacat” |
| Server Name | The DNS name of the server hosting Metacat, not including port numbers or the protocol (“http://”). |
| HTTP Port | The non-secure port where Metacat will be available. |
| HTTP SSL Port | The secure port where Metacat will be available. |
| Deploy Location | The directory where the application is deployed. |
Note
The Solr Home directory you choose should be writable/readable by the user solr.
The Environment Overwrites File should be writable/readable by the user tomcat8.
The section of Tomcat And Solr User Management on the Solr installation page will resolve this issue.
5.3.2. Authentication Configuration
Because you must specify the Authentication settings before you can access the main configuration page, the settings will always be configured when you view them in the admin interface. If you wish to change the authentication settings, you must restart Metacat to put the changes into effect. For more information about the Authentication configurations, please see Initial Configurations.
5.3.3. Skins Configuration
Customizing the look and feel of Metacat’s web interface is done via skins or MetacatUI themes, however as of Version 2.2.0, skins have been deprecated. Use MetacatUI themes instead. Themes can be deployed separately from the Metacat server allowing easier independent user interface customization.
5.3.3.1. MetacatUI Themes
Themes are applied in the Skins Configuration section. If you have installed
the optional Registry, which provides a web interface for creating, editing,
and submitting content to Metacat, you can also choose which form fields
appear in that interface and which are required. Note that if you do not have
a custom theme AND you are not using the Registry, you can simply save the
metacatui default configuration.
To use the new MetacatUI theming system, select metacatui and click the
Make metacatui default radio button. Metacat will open a list of options
that apply to the Registry interface. For more information about creating
custom themes, see the section called Modifying and Creating Themes.
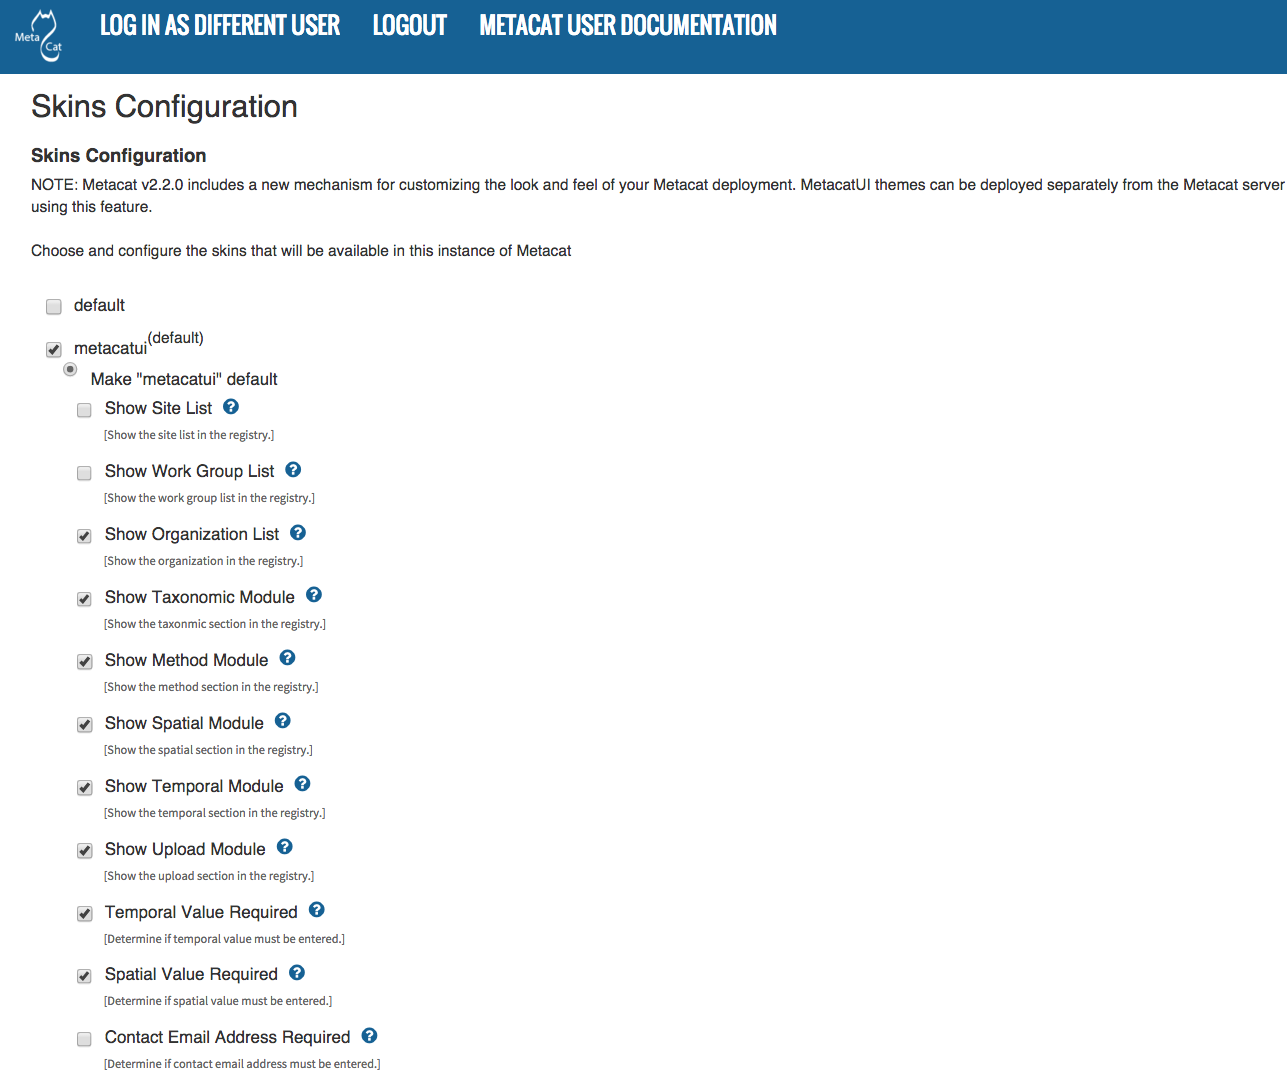
Configuring Metacat themes.
5.3.3.2. Skins
If your Metacat has a customized skin, it will appear as a choice in the
Skins Configuration settings (see below screenshot). Select the checkbox next
to your customized skin or and click the Make <skin_name> default radio button.
If you do not have a custom skin, select the default skin.
Once you have selected a skin, Metacat will open a list of options that apply to the Registry interface. For more information about creating skins, see the Creating a Custom Skin section in Modifying and Creating Themes.
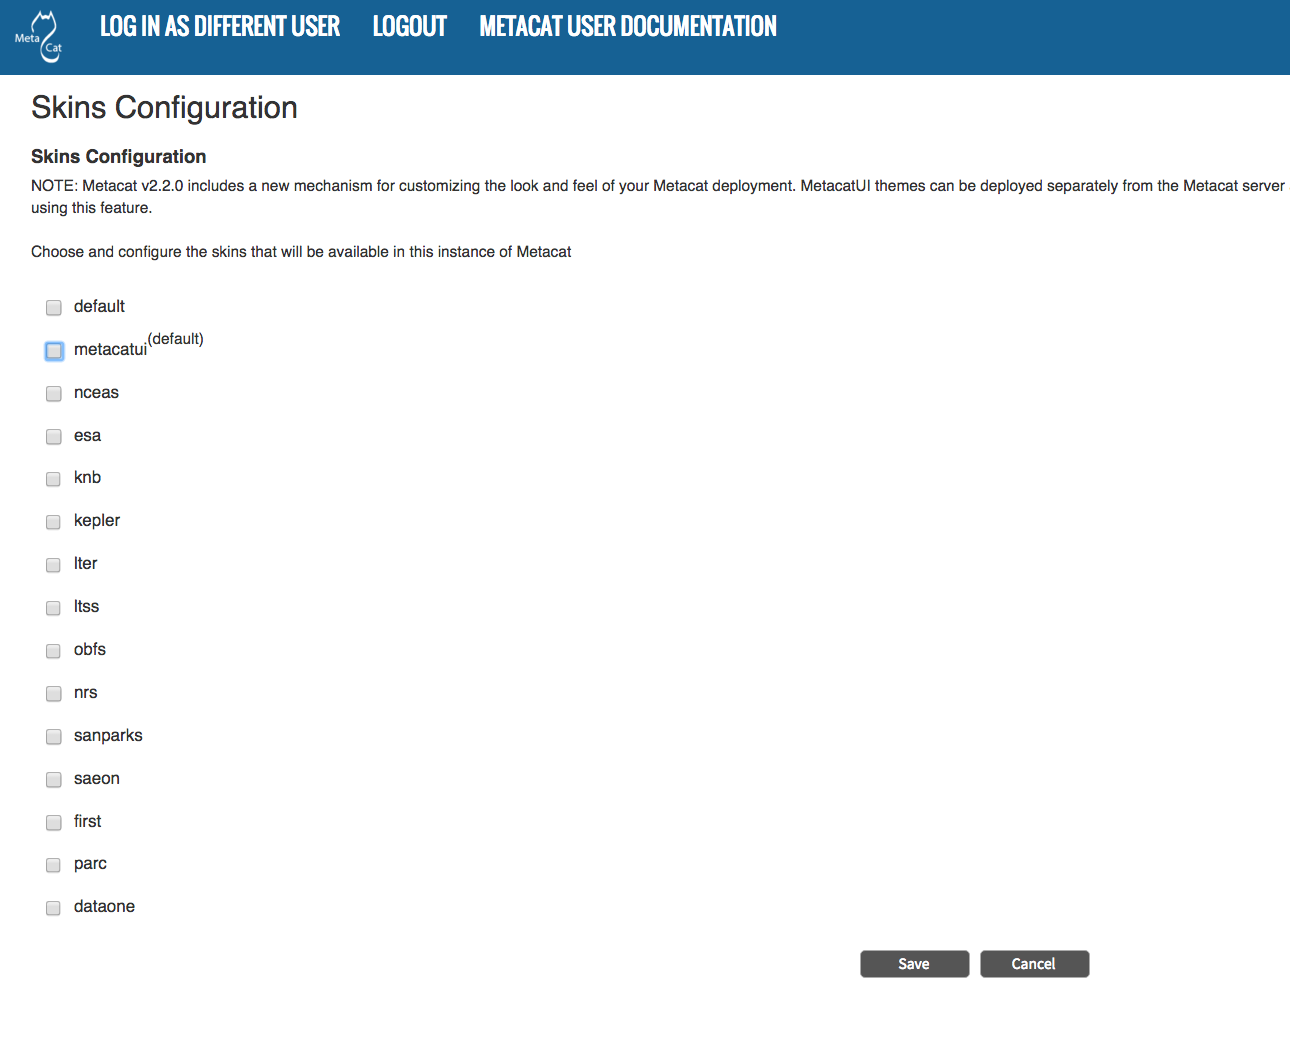
Configuring Metacat skins.
Select the checkbox next to your customized skin or and click the
Make <skin_name> default radio button. If you do not have a custom skin,
select the default skin. Once you have selected a skin, Metacat will open
a list of options that apply to the Registry interface.
Select the lists and modules that you would like to appear in the Registry form-interface by checking the box beside each. When you save the configuration, the customized interface will appear to site visitors.
5.3.4. Database Configuration
Because the Database Configuration is dependent on values specified in the Global Properties section, the link to these settings does not become active until after the global settings have been saved. Once the global settings have been saved, Metacat automatically detects the database schema version and upgrades it if necessary (and with your permission).
- New Installation
- Upgrade
5.3.4.1. New Installation
If Metacat determines that your database is new, the Database Install/Upgrade utility lists the SQL scripts that will run in order to create a database schema for the new version of Metacat.
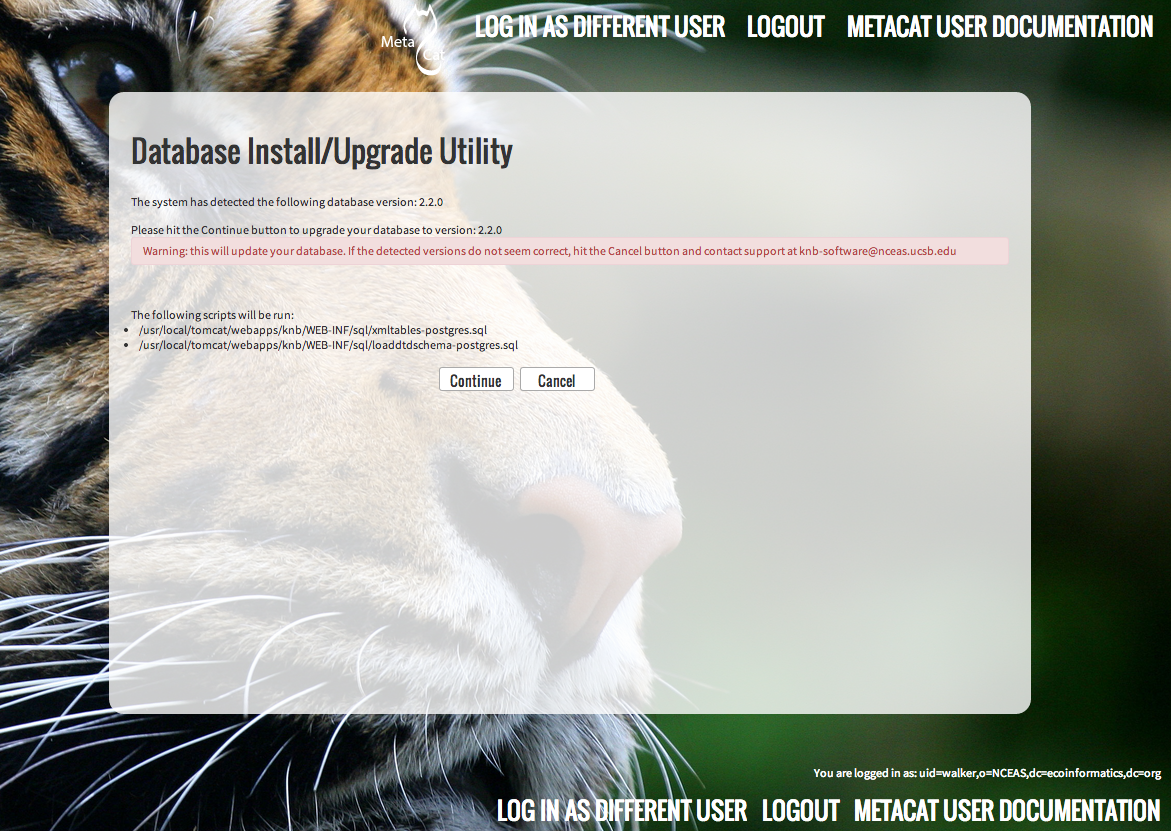
Database installation creates tables needed for Metacat.
If the database is not new, or if you have any questions about whether it is new or not, choose Cancel and contact support at knb-help@nceas.ucsb.edu.
When you choose Continue, Metacat runs the listed scripts and creates the database schema.
5.3.4.2. Upgrade
If Metacat identifies a previous database schema, the Database Install/Upgrade utility notes the existing version and lists the SQL scripts that will run in order to update the schema for the new version of Metacat.
If the detected schema version is incorrect, or if you have any questions about whether it is correct or not, click the Cancel button and contact support at knb-help@nceas.ucsb.edu.When you choose to continue, Metacat runs the listed scripts and updates the database schema.
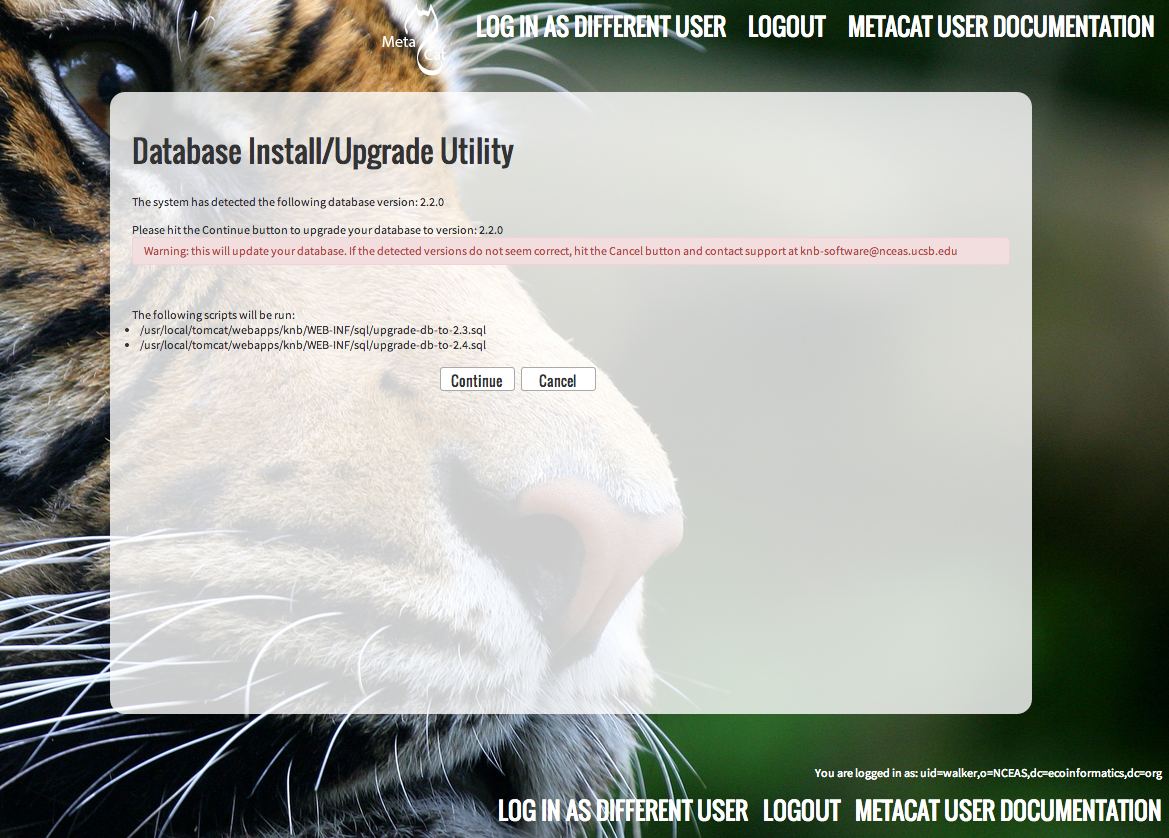
Upgrading an existing database.
Additional upgrade tasks may also run after the database upgrade is complete. For systems hosting large amounts of data, these upgrade routines can take time to complete. It is important to let the process complete before using Metacat otherwise your deployment may become unstable.
5.3.5. Solr Server Configuration
Because the Solr Server Configuration is dependent on values specified in the Global Properties section, the link to these settings does not become active until after the global settings have been saved. Once the global settings have been saved, Metacat automatically detects the status of the Solr Core and creates or upgrades it if necessary (and with your permission).
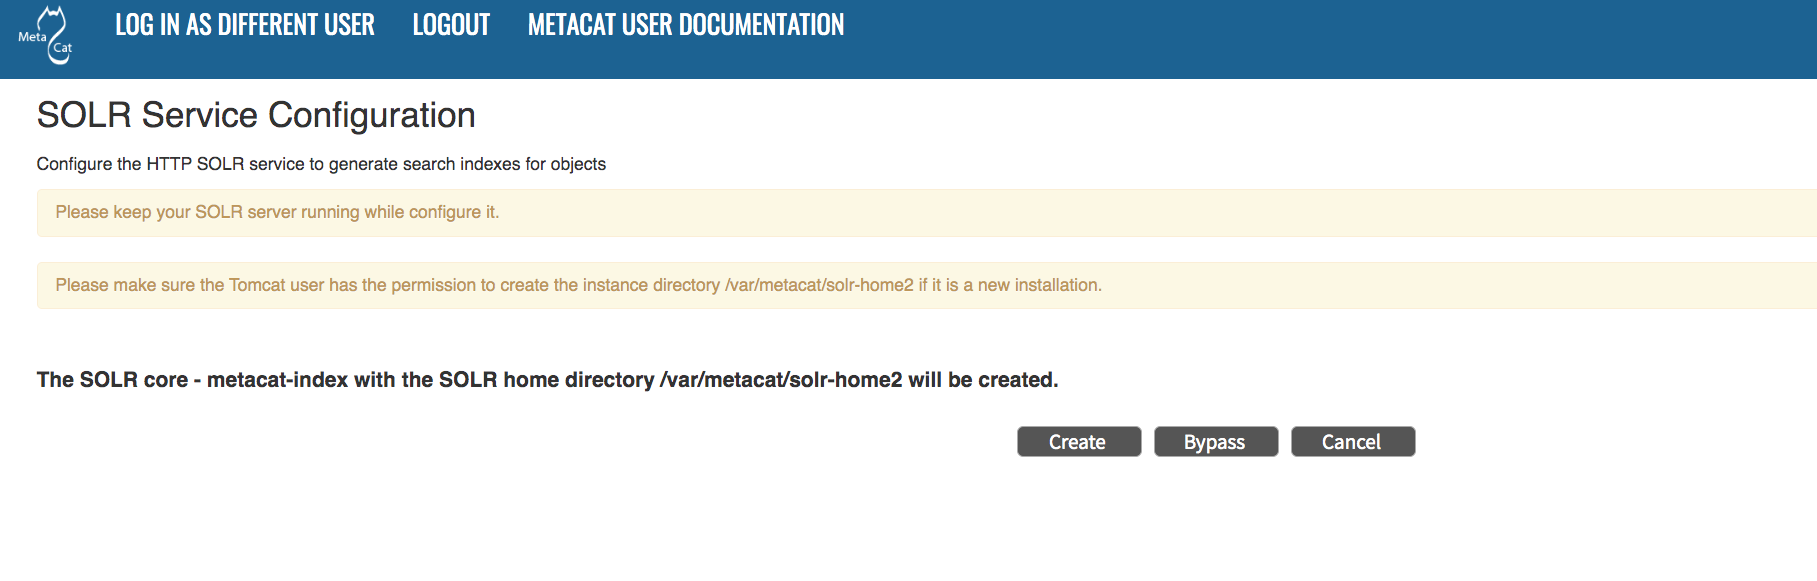
Note
Solr server should be running when you configure Metacat.
5.3.5.1. Troubleshooting
If you click the Solr Configuration button and get the error message like
Server refused connection at: http://localhost:8983/solr, this means the
Solr server is not running and you need to start it.
If you click the Create button to create the Solr core and get an error message
like Couldn't persist core properties to /var/metacat/solr-home2/, this means
the solr user doesn’t have the write permission to the Solr Home directory. You need
to add the solr user to the tomcat group, restart Solr server and Tomcat, log in again
and continue to configure Metacat. The instructions for adding users to groups can be found in the
Tomcat And Solr User Management part of the Solr installation page.
5.3.6. Geoserver Configuration
Metacat comes bundled with a Web Mapping Service called Geoserver, which converts spatial data into Web-deliverable map images. Geoserver installs with a default administrative username and password. We highly recommend that you change the default credentials so that only local administrators can make changes to your Geoserver. For more information about Geoserver, see Metacat’s Use of Geoserver.
When you choose the Geoserver Configuration link from the main configuration screen, Metacat will prompt you for a few important details about your Geoserver installation. The data directory and context settings allow Geoserver and Metacat to share the same spatial data store and render maps within Metacat skins. The security configuration prompts for a new admin password. After you enter the new settings, Metacat writes the information to the Geoserver deployment.
The default settings are typically appropriate for most Metacat deployments, but if you wish to skip the Geoserver configuration, click the Bypass button. Geoserver (if deployed) will remain with a default configuration and the main Metacat configuration screen will display the “bypassed” status beside the Geoserver settings. You will be able to run Metacat, but maps will not be rendered.
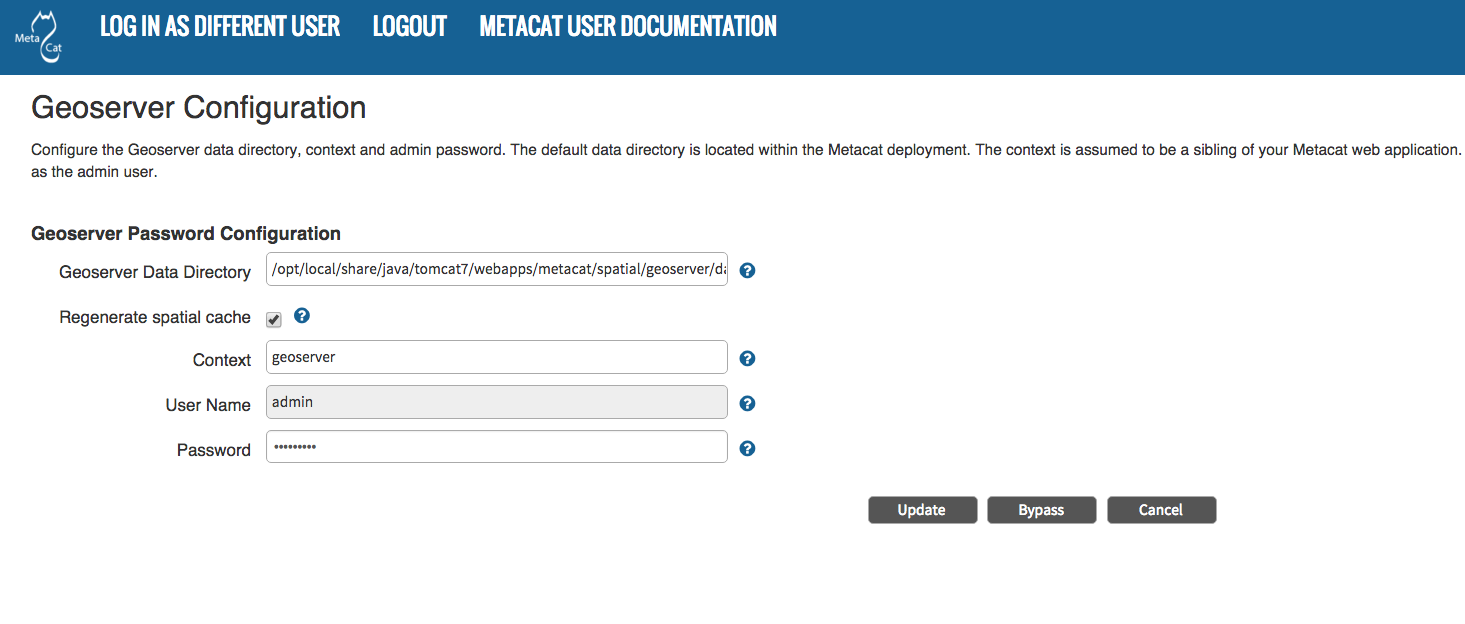
Configuring Geoserver.
5.3.7. DataONE Configuration
Metacat can be configured to operate as a Member Node within the DataONE federation of data repositories. See DataONE Member Node Support for background and details on DataONE and details about configuring Metacat to act as a DataONE Member Node.
5.3.8. Replication Configuration
Metacat can be configured to replicate its metadata and/or data content to another Metacat instance for backup and redundancy purposes, as well as to share data across sites. This feature has been used to create the Knowledge Network for Biocomplexity (KNB), as well as other networks. See Replication for details on the replication system and how to configure Metacat to replicate with another node.
Note
Note that much of the functionality provided by the replication subsystem in Metacat has now been generalized and standardized by DataONE, so consider utilizing the DataONE services for replication as it is a more general and standardized approach than this Metacat-specific replication system. The Metacat replication system will be supported for a while longer, but will likely be deprecated in a future release in favor of using the DataONE replication approach.
5.3.9. EZID Configuration
Metacat can be configured to assign Digital Object Identifiers (DOIs) to metadata/data objects through a EZID service. Click a blue question-mark icon beside any setting for detailed instructions. More information about each property is also included in the Appendix: Metacat Properties.
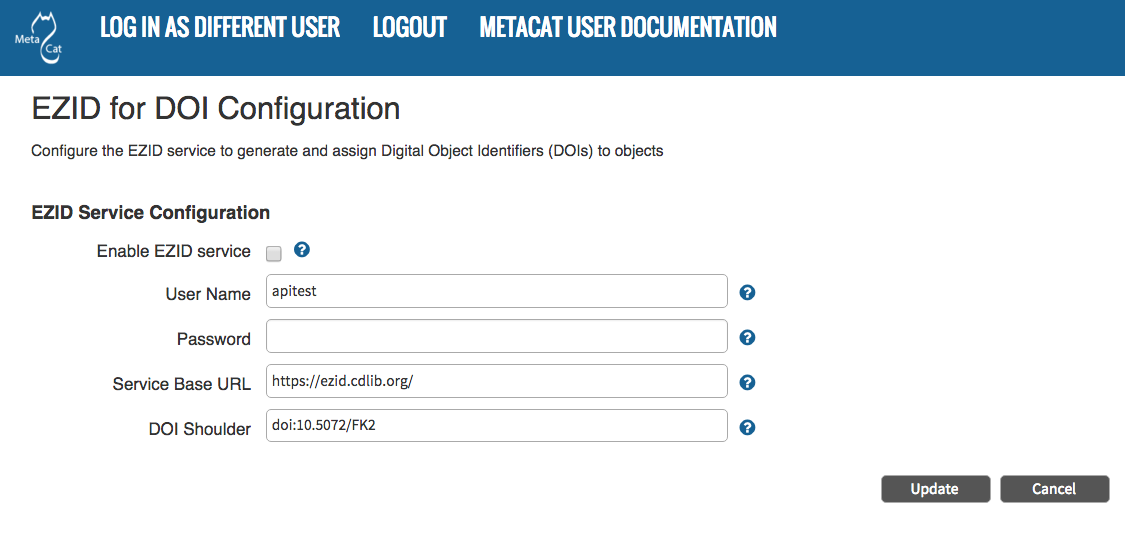
Configuring EZID service.
5.4. Additional Configuration
The most dynamic Metacat properties are managed and modified with the
form-based Metacat Configuration utility. These configuration properties can
also be accessed directly (along with additional static properties) via
Metacat’s property files: metacat.properties (which contains global
properties, e.g., authorization and database values) and
<SKIN_NAME>.properties (which contains skin-specific properties). Each of
these property files is discussed in more depth in this section.
5.4.1. The metacat.properties file
Metacat’s metacat.properties file contains all of Metacat’s global
properties, both the dynamic properties, which are managed with the
Configuration utility, as well as the more static properties, which can only
be modified manually in this file. The metacat.properties file also contains
optional properties that are only relevant when optional Metacat features
(such as the harvester or replication) are enabled. The `
metacat.properties file` is found here:
<CONTEXT_DIR>/WEB_INF/metacat.properties
Where <CONTEXT_DIR> is the directory in which the Metacat application code
lives (e.g., /var/lib/tomcat7/webapps/metacat). The path is a combination
of the Web application directory (e.g., /var/lib/tomcat7/webapps/) and
the Metacat context directory (e.g., metacat). Both values depend upon how your
system was set up during installation.
For information about each property and default or example settings, please see the Appendix: Metacat Properties. Properties that can only be edited manually in the metacat.properties file are highlighted in the appendix.
5.4.2. <SKIN_NAME>.properties
The <SKIN_NAME>.properties file contains skin-specific properties
(e.g., template information). For each skin, the skin-specific properties are
found here:
<CONTEXT_DIR>/style/skins/<SKIN_NAME>/<SKIN_NAME>.properties
Where <CONTEXT_DIR> is the directory in which the Metacat application code
lives (described above) and <SKIN_NAME> is the name of the skin
(e.g., default or nceas).
5.4.3. Additional configuration for Tomcat 7
When running Metacat on Tomcat 7, you may get the following error logging in via the Morpho application: “Fatal error sending data to Metacat: Bad Set_Cookie header:JSESSIONID=…”. In order to fix the issue, modify <Catalina_HOME>/conf/context.xml (e.g., /var/lib/tomcat7/conf/context.xml) by adding a new attribute - “useHttpOnly” - and set it to false for the “Context” element:
<Context useHttpOnly="false">
Then restart Tomcat 7.